Even experienced scripters may feel intimidated by the prospect of dipping their toes into the C++/SDK territory, especially when faced with the sheer volume of the documentation and all the topics covered. However, you don't have to go full C++ right away. In this walkthrough, I'll guide you through using the Function Publishing system to develop your own MAXScript functions. I will also demonstrate how to effectively incorporate these functions into a pair of sample scripted simpleMeshMods to get the best of both worlds.
Some topics and features I will only touch on briefly to keep the breakdown concise and actionable. It's not necessary to grasp every little detail on the first read; rather, I would encourage you to come back to revisit parts of the walkthrough and use them as stepping stones to learn more over time.
1. Visual Studio2. Max SDK
3. Max Plugin Wizard
4. Project Setup
5. First Build
6. Core Interface
7. Core Interface Instance
8. Interface Methods
9. Static Interface
10. Interface Methods Continued
11. THE Core Interface
12. Convenience Features
To get started, download and install Visual Studio – I'll be using 2019 Community (available for download at visualstudio.com) in the course of this article, and if your target is max 2018+, I suggest you do too. It is binary compatible with VS 2017 and a bit more friendly to C++ devs. That said, in the begining I will also provide instructions for those using VS 2017.
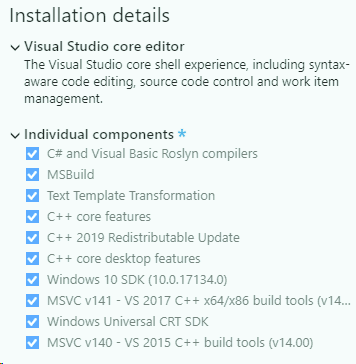
During the Visual Studio installation process, you will have to make some changes to the individual components installed – though the Desktop Development with C++ is a good start. At the very least, you need to pick the right Win 10 SDK and Platform Toolset versions – refer to the SDK Requirements page for the intended Max version. For example when developing plugins for Max 2018/19/20, make sure to pick both Windows 10 SDK (10.0.10586) and (10.0.17134.0) and VC++ platform toolsets v140 and v141. VS 2017 provides these options during installation process; VS 2019 will require a separate Windows 10 SDK download for the older version – you can get it from the Windows SDK archive.
You can also uncheck the Visual C++ ATL – there are still some MFC dependencies in the wizard but we'll get those sorted shortly. With such a long list of components, you might wonder whether to throw in a few extras before hitting the install button. No need to stress about it now. You can always come back to the installer later and tweak your component setup as you see fit.
When it comes to the C++ standard used, Max 2020 projects default to C++14, as does Visual Studio 2017. Technically, you may try and use C++17, since /std:c++17 is supposed to be binary compatible with /std:c++14 (and it seems to work without hitches) but you obviously better have a good reason for going that route in the first place. And if this is the first time you're hearing about different C++ versions, just make a mental note of it – the bottom line is that you can use tutorials that teach modern C++.
With that said, let's doublecheck the list:
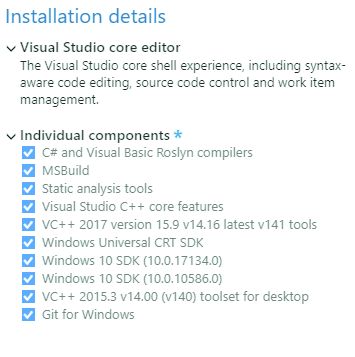
For 2017, the component list might look like this instead:
You need to install the SDK for each Max version that you want to build your tools for. There are several ways to do this. If you have the installation media for your target Max version, either go through the Instal Tools and Utilities submenu of the main Max installer or execute the msi from inside the x64\Tools\MAXSDK folder of the installer source files. For Max version 2017 and up, you can download the SDK installer and other related files from the Autodesk Platform Services page.
During the installation, I'd suggest that you change the destination folder for the SDK. The default location points into Program Files, and in the next steps you will need to edit a few files there. If you unpacked them into a protected folder, you'd have to take the ownership of those files (or the whole folder) to be able to modify them. It's more of a nuisance than a deal-breaker – still, it's easier if you choose a location for which you already have the necessary permissions. It's a good idea to include the Max version in the folder name, as each compatibility-breaking Max release comes with a new SDK.
The next step is to add the 3ds Max Plugin wizard to Visual Studio. Inside the maxsdk\howto\3dsmaxPluginWizard folder you will find the readme.txt file that details what you need to change in the template, as well as the files that you need to modify - both VS 2015 and 2017 are covered, the only thing different for 2019 is that you need to bump up the version to VsWizardEngine.16.0.
On a fresh VS install, you might need to create the vcprojects folder to copy the edited files to, too. Alternatively, you can use the %USERPROFILE%\Documents\<Visual Studio version>\Wizards folder – again, the folder will have to be created if it doesn't exist. Once you have done this and relaunched Visual Studio, you should be able to pick the 3ds Max Plugin wizard when creating a new project.
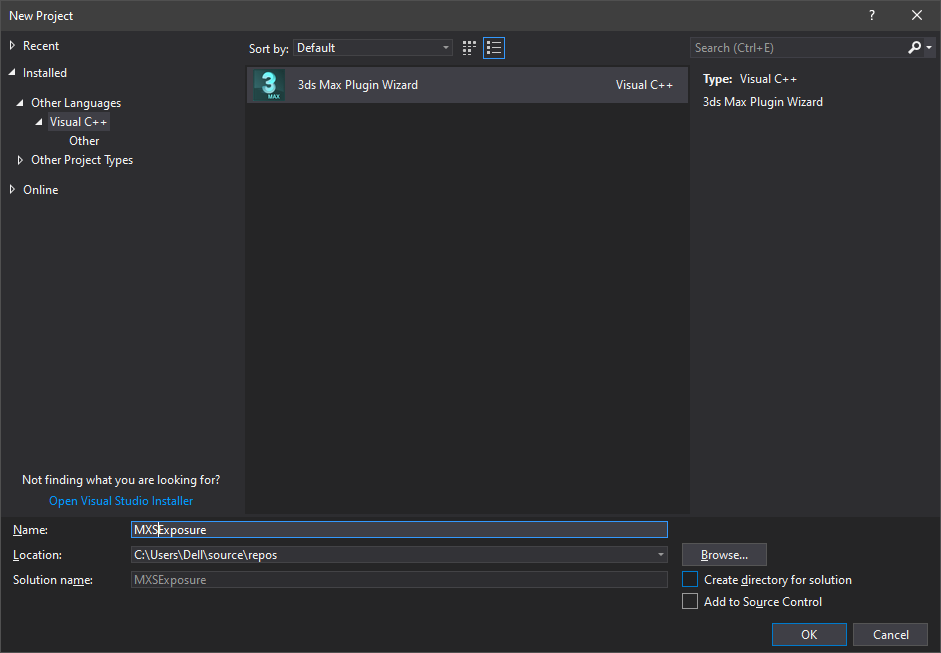
In VS 2019 you'd have to turn off filtering by language (if active) to see it. Most likely it won't be the top item – if you can't see it right away, scroll down and look for a 3ds Max icon.
In VS 2017, you input the project name and optionally uncheck the Create directory for this solution box to keep the project self-contained (which I do here) right when you pick the wizard:
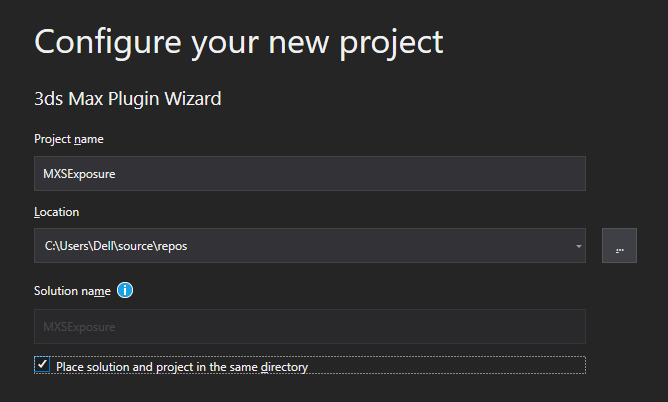
In vs 2019 a separate configuration windows pops up and the logic for the checkbox is reversed (I'm checking it, I have no plans to add other projects under the solution anyway). Bear in mind that the project name you enter will also be used as the class name by the wizard.
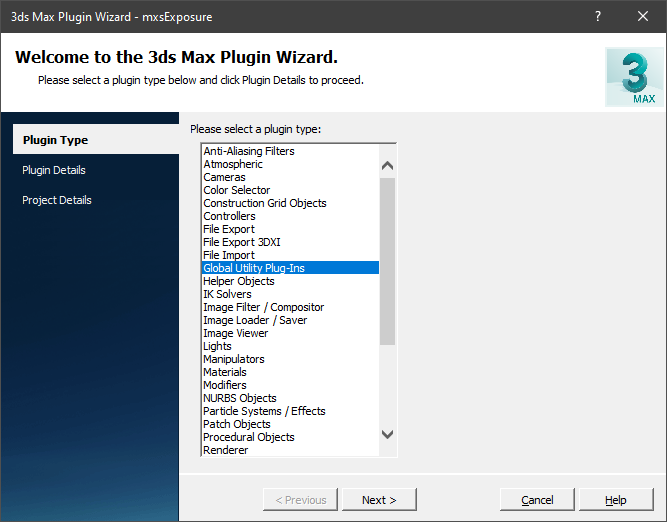
After confirming the project configuration, you should be greeted with the first page of the 3ds Max Plugin Wizard. Select Global Utility Plug-Ins as the plugin type. This is a plugin which does not provide a user interface, and will be ready to be used as soon as max is launched. Perfect for our custom MAXScript functions.
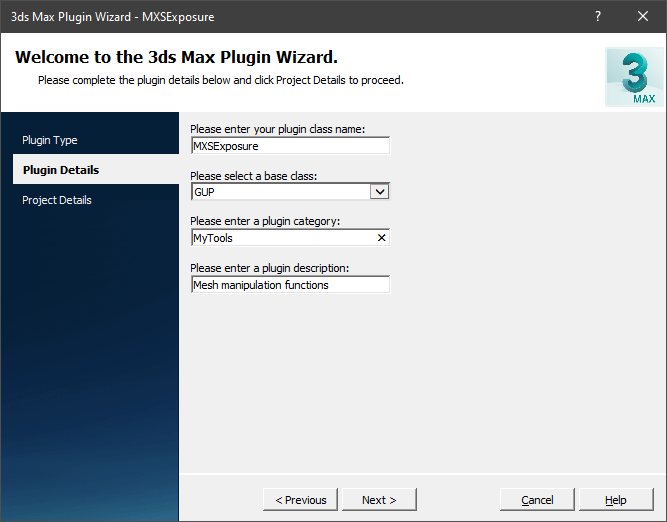
The additional empty fields you'll be asked to fill in on the next page are not that important. To give you an idea, if you ask for the .category of a plugin in max, it will return what you fill in here. The full description will show up when you open the Plug-in Manager.
At the last page, leave all the boxes unchecked and fill in the path using environment variables (they should be created by the Max and SDK installers):
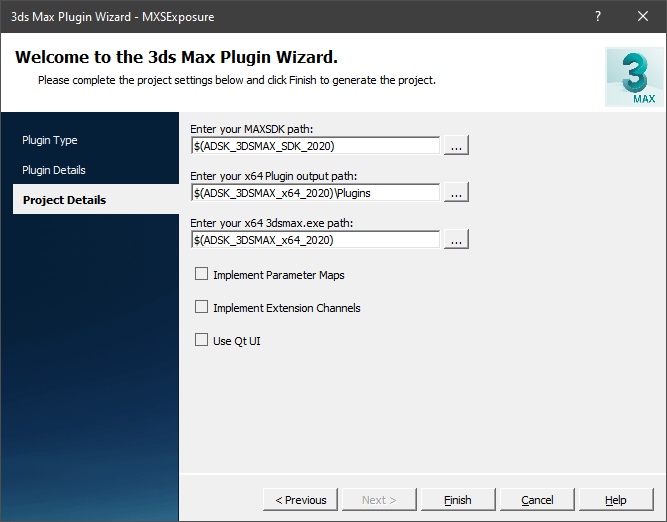
For 3ds Max 2020, those would be:
MAXSDK path: $(ADSK_3DSMAX_SDK_2020)
ouput path:  $(ADSK_3DSMAX_x64_2020)\Plugins
3dsmax.exe:  $(ADSK_3DSMAX_x64_2020)
Once you click the Finish button, the skeleton project should be set up for you and ready to be compiled. In case you want to know more about the details of the setup – or if you need something more complex in the future and the wizard will no longer cut it – there's a Manually Creating a New Plug-in Project section of the 3ds Max developer reference. Don't get discouraged if it opens to a blank page, the chapter contents are available in the sidebar.
With the project created, the workspace should look something like this:
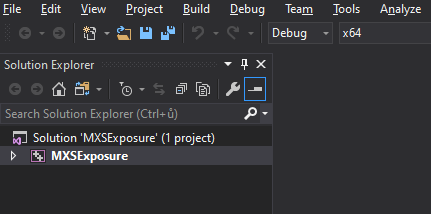
Since it's the only project in the solution, you can right-click the project name and choose Scope to This. It doesn't change the project confifguration in any way, you can think of it as removing one level of indentation in the folder tree so that a bit more fits in.
Now comes the important part to make it possible to actually build something. Click the 'Debug' dropdown in the toolbar and switch to the Hybrid config.

You might be used to running in Debug while developing but when you start out, you will be building against the release version of 3ds Max. Plugins built in Release mode obviously work with it, but for debugging purposes you are limited to the Hybrid config; optimizations are turned off and asserts are enabled – and to make the experience as nice as possible, Autodesk provides public debugging symbols for 3ds Max – not something you'll need right now if you're just dipping your toes, but it's worth keeping in mind for future reference. For the detailed walkthrough, refer to the 3ds Max Public Debug Symbols article.
And in case you're wondering why is the Debug config even there, it's because when you are tracking down some obscure bugs, you want to get as much information and possible, and a debug version of 3ds Max is handy for that. It is available for development and testing purposes through the Autodesk Developer Network. There are several ways to get the ADN Standard Membership to get access to it. For one, as an 'underfunded start-up developer' to quote the website, you can apply for a free ADN Standard membership. You can also get a one-year membership as a part of the AUGI (Autodesk User Group International) Professional Membership for individuals (see the terms for the ADN offer), it also comes as a benefit of the Autodesk Student Expert Membership, and there's special pricing available on demand for authors of learning materials (books/videos/online).
This is where we actually start touching the contents of the project that the wizard created. I tend to leave most of the auto-generated files as is, only delete the TODO #pragma messages from DllEntry.cpp. For what we do, we pretty much just need an empty gup plugin so there's nothing to do there and the TODOs would only pollute the error/warning list. Since I won't be providing any localization for the function printout either, I also remove the MaxSDK::Util::UseLanguagePackLocale(); call in the same file.
There's another TODO item in the same file, this time in the form of comment, //TODO: Must change this number when adding a new class. For our use case, the number will always be 1. While you can technically have multiple plugins inside one file – even of different types – it's not something you should ever need to do anyway.
The other cpp file is named the same as your project. As before, you can get rid of the TODO #pragma messages here as well. The wizard generated unique Class_ID for your plugin, and I might be happy to use it if weren't for the comment // Slapped together random num gen which doesn't exactly inspire confidence that there won't be a collision with other plugins. So I always generate a new one with the tools provided by Max – either directly within Max via genClassID() or with the help of the gencid.exe inside the maxsdk\help directory). This is up to you, I like to err on the side of caution.
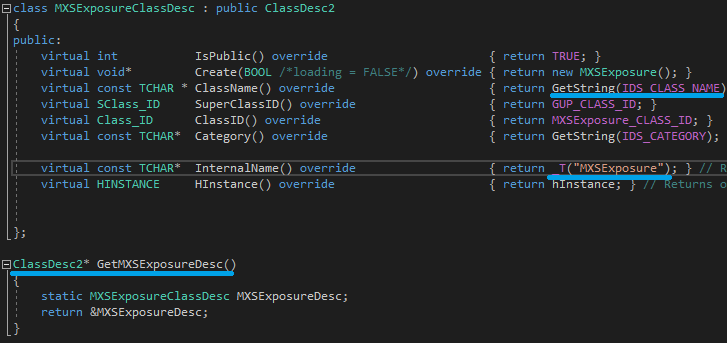
What really matters, however, is that the line where it says // Returns fixed parsable name (scripter-visible name) refers to the plugin name as seen by MAXScript – or rather, its MAXScript alias. Chances are you've named your project the way you want to access the published function interface (variations on MyFunctions are a natural choice, provided that it's an identifier that doesn't already exist and is not likely to cause a conflict with other devs' naming). Depending on your preference, you may want to have a single interface with all functions (the aforementioned MyFunctions), in which case Core Interface would be the better choice. Alternatively, you may prefer to group multiple interfaces under one common identifier, such as MyFunctions.MeshTools, MyFunctions.SplineTools, and MyFunctions.Math.
If the latter, everything is okay as is. You can skim through the Core Interface chapter and focus on the Static Interface one. If the former, you don't really want the property-less utility (that you cannot use in any way from MAXScript) to block the interface of the same name (identical names means one would be shadowed by the other). In that case, I tend to append "Util" to the name (it's a global utility plugin after all). Here, that would make it _T("MXSExposureUtil"). For the purposes of this tutorial, you can treat the _T(...) as something that tells the compiler this is text; it's actually a bit outdated macro that makes the string use either single-byte our double-byte characters (and since Max 2008 it will always be the latter) but you will see it so often in the SDK samples that you might just as well start getting used to it.
There's one other location where you also have to edit the string (and if you are familiar with the VS interface you can skip right there), but before we get to that, you might have noticed something else while editing the first one. In VS 2019, once you start making the edits, lots of squiggly lines will appear due to Code Analysis running in the background:
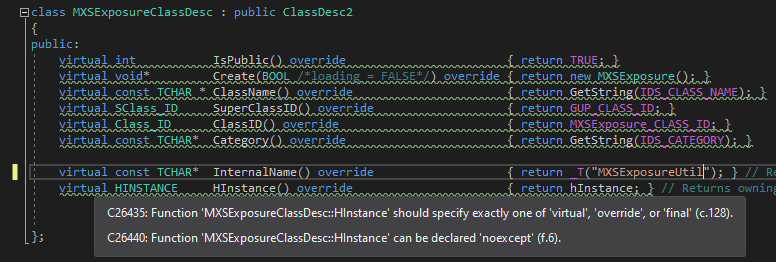
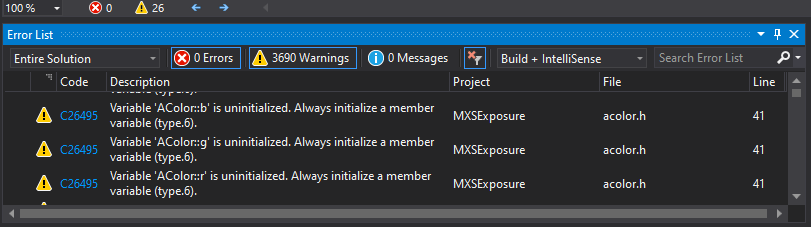
They mark the warnings emitted by checking the code against the rules used by Code Analysis (by default its the C++ Core Guidelines) and provide hints that you can hover over (as you can see from the tooltip) and sometimes offer matching FixIts. While certainly helpful while writing new code, I don't think anyone is terribly keen to see warnings for code that's out of their control. Especially in the Error List window (accessible through View > Error List or by clicking the stop sign/exclamation mark icon in VS 2019) they can actually drown the warnings that apply to your project (you can filter by current document but sometimes you really want to see a complete list of potential issues in your project without flipping through each and every file):
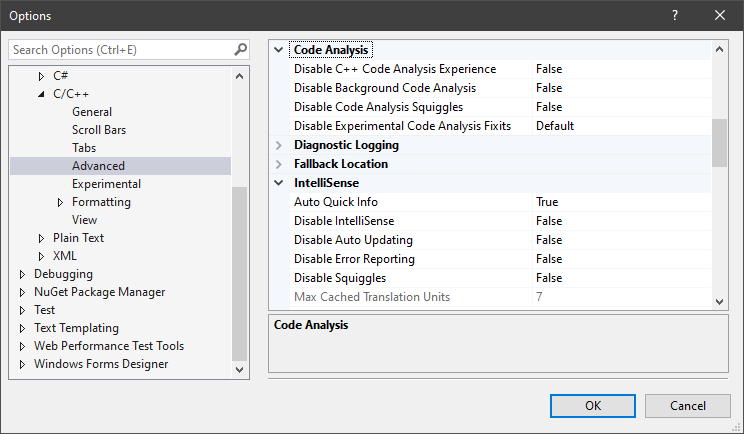
In VS 2017, you'd have to explicitly run Code Analysis to see this – and since it's a good practice to get into, I suggest you set Tools > Options > Text Editor > C/C++ > Experimental > Disable Background Code Analysis to False so that you get the updated error/warning list every time you save your files instead of only on demand. In VS 2019, this happens automatically on the fly by default.
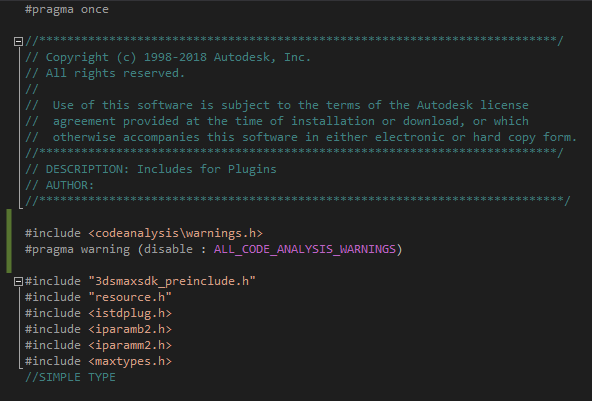
The next step is to filter out the SDK warnings without removing warnings for our code. Since the main include file is #included in all the autogenerated project files that we won't likely need to touch (other than to cleanup those warnings), we can paste these lines above the default includes to turn the warnings off for all the files using it:
#include <codeanalysis\warnings.h>
#pragma warning (disable : ALL_CODE_ANALYSIS_WARNINGS)
Saving the file should result in the warnings being removed (it may take a little while) and you should be left with a clean slate again. If that's not the case, try turning the Code Analysis off and on again (by toggling and applying Tools > Options > Text Editor > C/C++ > Advanced > Code Analysis > Disable C++ Code Analysis Experience twice):
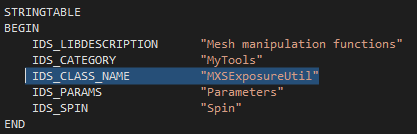
Time to pick up where we left off, with the name edits. The plugin className that will also be exposed to MAXScript and could shadow your interface name is taken from the value of IDS_CLASS_NAME, defined inside the resource file in the Resource Files folder. So let's have a look at it.
You might instinctively double-click it and expect it to open, but if you remember how I mentioned unchecking the MFC tools and you did just that before (or you went directly to the list of components and handpicked them one by one without checking this one), you will only get an error message – no dialog window for you. What dialog, you ask? Let me show you.
Right-click that .rc file and choose Open With... C++ Source Editor. The afxres.h header is a part of the MFC Library which works as an easier-to-use enhancement of Win32. Since you can use MAXScript/pySide for the UI part, we won't need it. Still, it's useful to know how to deal with it. Aside from defining symbols used by the MFC framework, afxres.h #includes winres.h that's needed by the Visual C++ generated .rc files. So, let's skip the MFC-specific parts and put back only what's needed. Go ahead and find and replace afxres.h with winres.h and save and close the .rc file.
Now you should be able to double-click the .rc file, and navigating to the dialog inside the treeview that opens and double-clicking it should open in the designer.
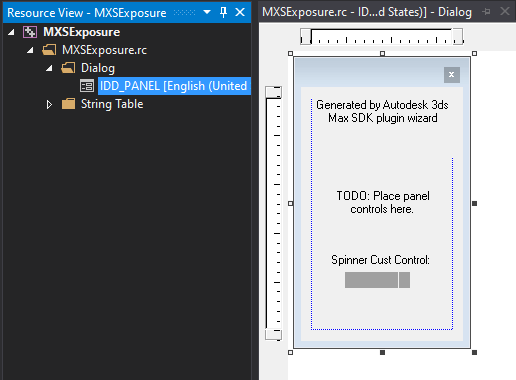
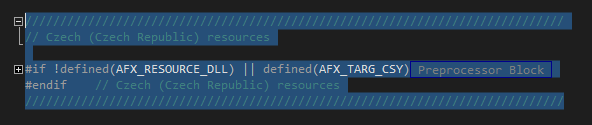
It could be useful as a starting point when you're making regular utility plugin that shows up in the utility panel but since all I care about now is publishing functions, I can delete that without regrets – one regret maybe: if you do that through the UI, it will insert an empty language block for your language. You can safely delete that when you reopen the file with source code editor:
While you're inside the .rc file, if you want to start with the Core Interface (and I recommend that, or rather I recommend you try both) don't forget to replace the string that corresponds to the IDS_CLASS_NAME, too. I'll put there "MXSExposureUtil" once more (if you can think of a reason to make the className and the MAXScript alias different, feel free to pick another one):
And since we have no use for localization, let's turn off the .mui file postbuild event, too. Right-click the project name, choose Properties and navigate to Configuration Properties > Build Events > Post-Build Event:
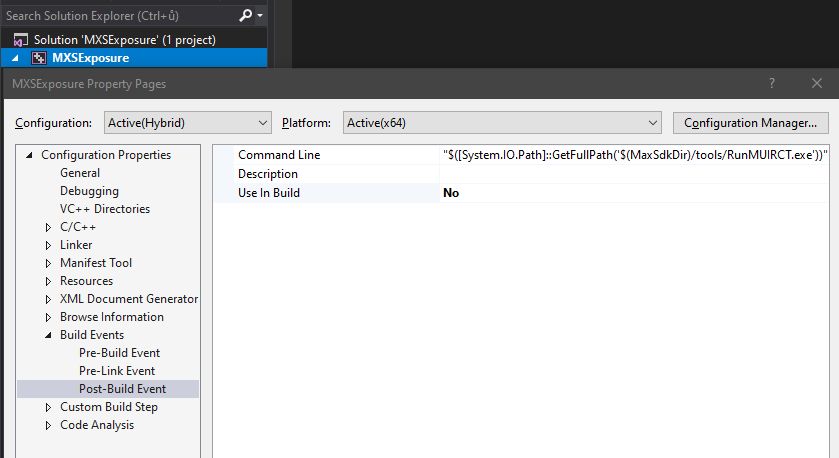
You can make the change apply only to the current configuration (Hybrid) or to All Configurations.
There's one last thing to get off the table before building the project. The default output location for the compiled plugin is the Plugins folder. While this sounds straightforward, it may trip you up at first. Since you'll want to be able to write into that folder, you have to take ownership of it. Another option is to add an entry in plugin.ini that points to a directory you have access to, and change the build properties accordingly.
The modern alternative is to use the Autodesk Application Plug-in Package (you can find the standards plugins using it in the ApplicationPlugins folder in the 3ds Max root directory). This is something you should be aware of and make use of it once you're more comfortable with the whole development process, once you want to start distributing your plugins. For now, let's keep it simple and stick with the wizard defaults.
With this part done, you should be able to Build the plugin, Build > Build Solution. If all permissions for all the folders are set correctly, the build should succeed and you can run Max the way you're used to or from VS via Debug > Start Without Debugging.
By default, if you Start this way and the project has been changed in the meantime, it will be rebuilt (that way if you want to build and run, all you need to do is press Ctrl+F5) - if you don't like that, you can change it under Tools > Options > Projects and Solutions > Build and Run, in the first dropdown (by default Always build). When you open the MAXScript Listener, you should be able to query the utility category and class:
If you're using version control, now is the time for the celebratory clean-slate commit!
If you change anything in the project and try to rebuild now while max is running, the build will fail because the plugin is loaded in max. You can avoid having to kill it manually by adding a Pre-Build Event through Configuration Properties > Build Events:
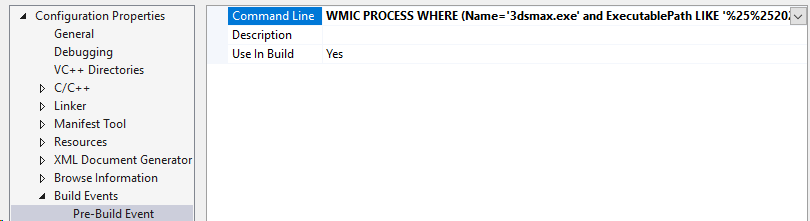
WMIC PROCESS WHERE (Name='3dsmax.exe' and ExecutablePath LIKE '%25%252020%25%25') call TERMINATE
The %25%252020%25%25 part actually evaluates to %%2020%% and in batch mode this translates yet again to %2020% – which is what you'd use when at command prompt. It's there to kill only those 3dsmax.exe processes that have 2020 in their path; you can match simply against (Name='3dsmax.exe') if you don't want to discriminate.
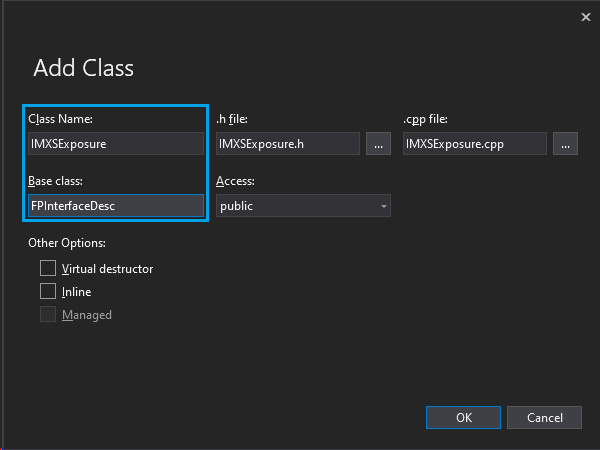
If you followed all the steps, the plugin should load and be accessible by MAXScript at this point. All that remains is to make it do something as well. For that let's add a new class to the project, Right-click the project name in the Solution Explorer and pick Add > Class... For the class name, I tend to prefix the plugin class name with 'I' for Interface (since it will be eventually exposed as one of the Core Interfaces). Fill in only the two fields framed by the blue rectangle, the class name of your choice and FPInterfaceDesc that the class will inherit from, leave the rest at their default (or autocompleted) values.
This is what the class .cpp file might look like, depending on your current VS configuration and version:
#include "IMXSExposure.h"

IMXSExposure::IMXSExposure() { }
IMXSExposure::~IMXSExposure() { }
Or it might be an empty file with just the #include "YourClassName.h" on the first line in which case you don't need to do anything with it. If there's a constructor and a destructor of the class like here, I want you to delete everything but the first line. The only thing we care about now is that the first line #includes the matching class header file.
What the header files actually are, and how you should structure your code around them, is a topic for another discussion (with lots of strong opinions along the way, even more so now that modules are almost here). Let's just say that you can usually think of them as sort of contract saying 'these are the prototypes of the data structures and functions I'll be using, they'll be implemented in a cpp source file that #includes this header somewhere along the way'. You can (and will) #include header files in other headers, and since this can nest pretty deep, there's a handy way to prevent duplicate #includes with a directive which Visual Studio will automatically insert into each new header file for you, #pragma once (you'll also often see guard macros in older files from before this was supported).
In the case of the SDK headers found in the maxsdk\include folder, this means that you can include them in your code and work as if your project were part of the max project. There's more to it, especially when it comes to actually building the project – we'll get to that later.
Keep in mind that while you'll find other max header files in the maxsdk\samples folder, you should only treat them as such, as samples to further your understanding of how things are done max-side. Everything outside the include and lib folders is subject to change, so if you included any of those header files, your plugin may break after a point update.
The wizard puts header files and source files in separate directories when it creates the project (and when you add a new class). You don't have to abide to that, some people prefer flat structure instead. In fact, your entire project structure could be just the DllEntry.cpp (or – by convention – main.cpp if you were building an executable), it just wouldn't be all that practical.
The contents of the initial header file might look similar to this:
#pragma once
#include "C:\maxsdk20\include\ifnpub.h"

class IMXSExposure :
    public FPInterfaceDesc
{
public:
    IMXSExposure();
    ~IMXSExposure();
};
You can see VS was clever enough to find the file to include based on the class we inherit from. Still, I prefer to replace it with a shorter and more descriptive <ifnpub.h>. The 'shorter' part is rather obvious (it's in the include path so no problems with discovery here), as for 'descriptive', I'm talking about the angle brackets here that indicate it's a non-local header file.
We don't need the explicit destructor for our use case either, there's no mess we'd be leaving behind. And since we've already removed it from the .cpp file before, that's one error going away. To get rid of the other one, we'll inline the constructor (this is just to make things simpler for us, though, it won't be a small and nice method where it'd make sense from an optimization point of view). If there's no constructor added in your file, write a new one – do note that you want it to come after the public access specifier. Add one if it's not there – by default if it wasn't specified, it would be private for C++ classes.
Finally, I'll add the base class constructor explicitly. It should now look something like (don't miss the final empty pair of curly braces):
#pragma once
#include <ifnpub.h>

class IMXSExposure : public FPInterfaceDesc
{
public:
    IMXSExposure() : FPInterfaceDesc() { };
};
Since including a bare header #include like this will again trigger the Code Analysis, the warnings are back again. But now we want to disable them only for the SDK includes and restore them right after that so that our code gets checked. To do this, let's create a pair of macros that explain the intent. Right-click the Header Files folder, Add > New Item... and pick Header file (.h). The first one will be called warnings_disabled.h; delete the #pragma once directive – we want this to be always inserted – and paste this instead:
#include <codeanalysis\warnings.h>
#pragma warning (push)
#pragma warning (disable : ALL_CODE_ANALYSIS_WARNINGS)
For the other new file, warnings_restored.h, the entire contents of the file will be (again without the #pragma once):
#pragma warning (pop)
After wrapping the SDK #includes with these two headers, the file looks like this:
#pragma once
#include "warnings_disabled.h"
#include <ifnpub.h>
#include "warnings_restored.h"

class IMXSExposure : public FPInterfaceDesc
{
public:
    IMXSExposure() : FPInterfaceDesc() { };
};
Is there a better way? That depends, there are experimental command line switches to set the warning level for external headers (you can set it to zero to eliminate them) that you can add to project properties, C\C++ > Command Line > Additional Options. For example:
/experimental:external /external:anglebrackets /external:W0
But since that's compiler-level, it won't rid you of the cascade of Intellisense warnings in the Error List. As far as I know, there's nothing like this for the built-in analyzer – though it may be supported in the future, once the option gets out of experimental.
Try to build and run to confirm you didn't miss any step. Functionally, nothing changes on the Max side, since we still haven't registered our interface – it doesn't even have a name. That's the next step (unchanged code in gray):
#pragma once
#include "warnings_disabled.h"
#include <ifnpub.h>
#include "warnings_restored.h"

extern const Interface_ID MXSEXPOSURE_INTERFACE_ID; // not specified here, just made available for callers

class IMXSExposure : public FPInterfaceDesc
{
public:
    IMXSExposure() :
        FPInterfaceDesc(
            MXSEXPOSURE_INTERFACE_ID, _M("MXSExposure"), 0, nullptr, FP_CORE
            , p_end) { };
};
To register it, you need several things. Here are all the parameters explained:
- a unique interface ID represented by the
MXSEXPOSURE_INTERFACE_IDplaceholder - a name for the interface which will be different from the exposed plugin className; here I'm using
_M("MXSExposure")– the_Mmacro is used to make the string conform with how Unicode is handled now in Max - the zero stands for 'no ID to lookup in the .rc stringtable'; if nonzero, it would be a localizable description which we don't provide here
- the
nullptrstands in place of a pointer to ClassDesc2, which isn't needed for Core Interfaces FP_COREis a flag that describes the type of the interface –Corefor interface that can be called directly, which is perfect for general purpose methods- the
p_endmarks the end of the parameters passed to the base class constructor.
Let's examine the other new line. The const Interface_ID bit indicates this is a value that won't change (you will often see #define used for that purpose in older code), and the extern keyword makes the compiler look elsewhere for the actual definition. Where macros would have been used before, you'll now often see const or contexpr, and although there are certain differences, I follow the rule to make them express the intent behind using one or the other. I.e. extern static const in header file for something that you want to make available but don't need to know the actual value of, and constexpr for something you initialize on the spot with a meaningful value that gives you some information (say number of ticks in a second).
If you build now, you still won't see anything new when in max – for that, it's necessary to assign the ID and create an instance of the IMXSExposure class first. Let's switch to the .cpp file and do just that:
#include "IMXSExposure.h"

const Interface_ID MXSEXPOSURE_INTERFACE_ID(0x445ddd85, 0x24dd2aa1);
static IMXSExposure interfaceSingleton;
The empty interface should then be successfully registered when you run the built solution:
Since you will get warnings here (if you are using the C++ Core Guidelines checker) that you can't act on, let me digress a bit and mention another way to suppress them – and that's the suppress warning specifier that applies to the following line only:
#include "IMXSExposure.h"

#pragma warning(suppress: 26426) // non-constexpr constructor
const Interface_ID MXSEXPOSURE_INTERFACE_ID(0x445ddd85, 0x24dd2aa1);
#pragma warning(suppress: 26426) // non-constexpr constructor
static IMXSExposure interfaceSingleton;
Done this way, it serves to document that we are aware of the warning and have knowingly chosen to suppress it for this particular line of the code.
As with the folder structure, there are no strict rules or generally accepted guidelines when it comes to code style and naming conventions either (and the same goes for whitespace). I stick to naming public methods and member variables with an initial capital letter (HasMapChannel), private member variables and helper functions not declared in header files with an initial lowercase letter (bendAroundX), and macros and constants (used the way #define would be used before) with all-caps snake case (MXSEXPOSURE_INTERFACE_ID).
To prepare for adding the methods, you need to provide an enumeration of identifiers for each function, as well as an implementation of the _dispatch_fn memeber function that works behind the scenes to unbundle the parameters from the indirect call parameter structure, forward them to the correct implementation method, and bundle the return value into an FPValue – which is fortunately handled for us if we use the FUNCTION_MAP macros:
#pragma once
#include "warnings_disabled.h"
#include <ifnpub.h>
#include "warnings_restored.h"

extern const Interface_ID MXSEXPOSURE_INTERFACE_ID; // not specified here, just made available for callers

class IMXSExposure : public FPInterfaceDesc
{
public:
    enum functionID : FunctionID { };

    IMXSExposure() :
        FPInterfaceDesc(
            MXSEXPOSURE_INTERFACE_ID, _M("MXSExposure"), 0, nullptr, FP_CORE
            , p_end) { };

    BEGIN_FUNCTION_MAP
    END_FUNCTION_MAP
};
To demonstrate, I'm going to make a UV Seam Select modifier. For that I need to be able to select some edges first. To do that, it's enough to set the proper selection level of the mesh you get inside a simpleMeshMod. Since the function will directly modify the mesh and won't have anything to return, the return type is void, and the parameters are the Mesh pointer and the desired selection level. The resulting method will not modify the interface class in any way so it can also be declared as a const method (you will see it used in the SDK samples and headers, and it helps being aware of the meaning behind it):
void SetMeshSelLevel(Mesh* mesh, int level) const;
Within the function map block, we'll utilize a VFN_2 macro for Void FuNction with 2 parameters, and give it an ID (which refers to the functionID enum), the function name itself, and the types of its two arguments.
VFN_2(setMeshSelLevel_id, SetMeshSelLevel, TYPE_MESH, TYPE_INT)
Don't forget to add the setMeshSelLevel_id to the functionID enum.
Finally, inside the constructor body we need to call the AppendFunction method, and provide it with:
- the function ID
- the name that you want to use when calling the function
zeroto indicate there's no descriptor string resource ID- the return type of the function
- flags – we'll get to those later, for now the default empty flag (zero) will suffice
- the number of parameters that will follow.
FPInterfaceDesc constructor, splitting it into separate function calls makes it easier to edit and less prone to errors, albeit more verbose:
setMeshSelLevel_id, _M("SetMeshSelLevel"), 0, TYPE_VOID, 0, 2
After that follow the parameters. Each parameter lists a name, resource string (zero again) and its type:
    , _M("mesh"), 0, TYPE_MESH
    , _M("level"), 0, TYPE_INT
You may notice I didn't put the comma at the end of the previous line and instead begin each line of parameters with one – it's a convention that makes it simpler to add/remove parameters without having to take care of the leftover trailing commas. You can find more arguments in favor of that style, but ultimately it's up to you to choose what suits you best.
Ultimately, the argument list always ends with the p_end tag. This is mandatory as it marks the end of variable arguments.
Putting it all together:
#pragma once
#include "warnings_disabled.h"
#include <ifnpub.h>
#include "warnings_restored.h"

extern const Interface_ID MXSEXPOSURE_INTERFACE_ID; // not specified here, just made available for callers

class IMXSExposure : public FPInterfaceDesc
{
public:
    enum functionID : FunctionID {
        setMeshSelLevel_id,
    };

    IMXSExposure() :
        FPInterfaceDesc(
            MXSEXPOSURE_INTERFACE_ID, _M("MXSExposure"), 0, nullptr, FP_CORE
            , p_end) {
        AppendFunction(
            setMeshSelLevel_id, _M("SetMeshSelLevel"), 0, TYPE_VOID, 0, 2
            , _M("mesh"), 0, TYPE_MESH
            , _M("level"), 0, TYPE_INT
            , p_end);
    };

    BEGIN_FUNCTION_MAP
        VFN_2(setMeshSelLevel_id, SetMeshSelLevel, TYPE_MESH, TYPE_INT)
    END_FUNCTION_MAP

    void SetMeshSelLevel(Mesh* mesh, int level) const;
};
And because I'm a lazy guy, I also put in two convenience macros to save me from copy-pasting and editing everything by hand anytime I rename a function. It's not perfect, the identifier inside the enum won't be autorenamed, but the other ones will and for me that's enough to justify that:
#pragma once
#include "warnings_disabled.h"
#include <ifnpub.h>
#include "warnings_restored.h"

#define FUNC_STR(func) _M(#func) // stringifies the passed variable
#define FUNC_ID(func) func##_id  // concatenates the variable name with _id

extern const Interface_ID MXSEXPOSURE_INTERFACE_ID; // not specified here, just made available for callers

class IMXSExposure : public FPInterfaceDesc
{
public:
    enum functionID : FunctionID {
        FUNC_ID(SetMeshSelLevel),
    };

    IMXSExposure() :
        FPInterfaceDesc(
            MXSEXPOSURE_INTERFACE_ID, _M("MXSExposure"), 0, nullptr, FP_CORE
            , p_end) {
        AppendFunction(
            FUNC_ID(SetMeshSelLevel), FUNC_STR(SetMeshSelLevel), 0, TYPE_VOID, 0, 2
            , _M("mesh"), 0, TYPE_MESH
            , _M("level"), 0, TYPE_INT
            , p_end);
    };

    BEGIN_FUNCTION_MAP
        VFN_2(FUNC_ID(SetMeshSelLevel), SetMeshSelLevel, TYPE_MESH, TYPE_INT)
    END_FUNCTION_MAP

    void SetMeshSelLevel(Mesh* mesh, int level) const;
};
Now is the time to add the function definition. As you might expect, you can do it via Quick Actions (or Alt-Enter if you're on the line of the method declaration) > Create Definition of 'SetMeshSelLevel' in matching .cpp. If you want to do that by hand to get a feel for it, copy-paste the declaration into your cpp file, prepend ClassName:: to the method name and you add a body instead of the semicolon. I've also taken the liberty of adding a check if the pointer we get is valid (you can compare it to nullptr instead, both ways are idiomatic):
#include "IMXSExposure.h"

#pragma warning(suppress: 26426) // non-constexpr constructor
const Interface_ID MXSEXPOSURE_INTERFACE_ID(0x445ddd85, 0x24dd2aa1);
#pragma warning(suppress: 26426) // non-constexpr constructor
static IMXSExposure interfaceSingleton;

void IMXSExposure::SetMeshSelLevel(Mesh* mesh, int level) const {
    if (!mesh) return;
}
However, if you now start writing code expecting to get autocomplete suggestions for the mesh methods, you are in for some bad news – you'll only get a pointer to incomplete class type is not allowed error. Reason behind that is that there's no #include that'd provide the necessary info. How do you find the right one? In this case, Visual Studio comes to the rescue again - you can see that the Mesh type is properly highlighted and when you hover over it and press CTRL, wait for it to turn into a hyperlink and click it, you'll be redirected to the right header file - in this case mesh.h. Let's #include it, within the guarding disable/restore includes pair to prevent warning creep.
With that done, we should be able to leverage the help of the autocomplete to find the desired selLevel property and with it make the method actually do something:
#include "warnings_disabled.h"
#include <mesh.h>
#include "warnings_restored.h"
#include "IMXSExposure.h"

#pragma warning(suppress: 26426) // non-constexpr constructor
const Interface_ID MXSEXPOSURE_INTERFACE_ID(0x445ddd85, 0x24dd2aa1);
#pragma warning(suppress: 26426) // non-constexpr constructor
static IMXSExposure interfaceSingleton;

void IMXSExposure::SetMeshSelLevel(Mesh* mesh, int level) const {
    if (mesh) mesh->selLevel = level;
}
As an(other) aside, if you've never been exposed to pointers before, it's time to get familiar with them (otherwise you can skip ahead). There's a great Introduction to Pointers for C++ that should help you understand the basics. Don't despair if you don't get them right away, what you need to get started pretty much boils down to this:
int *ints = new int[5]; // dynamically allocates memory for 5 integers
Mesh* mesh here), use the arrow operator in the same way you would use the dot operator:auto objectState = node->EvalWorldState(ip->GetTime(), true); // node and ip are pointers
MNMesh poly(*mesh); // local variable that you better not return as a pointer, intialized with a dereferenced pointer
poly.MakePolyMesh(0, false); // using the dot operator
new:auto newMesh = new Mesh(*mesh); // make a copy from the mesh pointer ... return newMesh;
& and * are inverse to each other (unless either of them is overloaded); if p is a pointer &*p is that same pointer again. This is best presented in a table form, as taken from the cplusplus.com tutorial on classes:| expression | can be read as |
|---|---|
*x | pointed to by x |
&x | address of x |
x.y | member y of object x |
x->y | member y of object pointed to by x |
(*x).y | member y of object pointed to by x (equivalent to the previous one) |
nullptr the same way you'd pass undefined in MAXScript), otherwise references are preferable (const ones for input-only parameters)I'll try and show some common scenarios with two more example functions soon, which might be more helpful than just learning the theory of it. For now, let's return to the task at hand.
Rebuilding the project finally gets us somewhere:
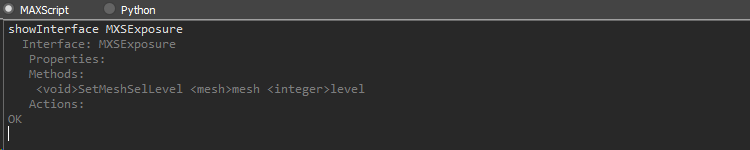
And just like that, we can now create our first SDK-enabled modifier using the function to do what we couldn't do with pure MAXScript before. For the time being, it will just select all edges and set the current stack subobject level to the edge mode:
plugin simpleMeshMod UVSeamSelectname:"UV Seam Select"classID:#(0x34c4905c, 0x106b1548)(on modifyMesh do(setEdgeSelection mesh (mesh.edges as bitArray)MXSExposure.SetMeshSelLevel mesh 8))
As you've probably noticed, I'm using the magic number eight for edge mode – no worries, that's yet another thing that I will address later. Why eight? The Mesh selection level bit flag for edges level is 1<<3 (MAXscript equivalent would be bit.shift 1 3). Hard to tell why they're flags in the first place, maybe there used to be a plan to support multiple active subobject levels at the same time. Anyway, using hardcoded values like this is okay for quick and dirty testing, but if you can help it, it better not find its way into the production environment.
There are other things you may question, and question them you should as I wouldn't like to encourage cargo-cult programming here. For example, the only reason I put an asterisk next to the type instead of the variable name is that that way it's easier for me to tell at a quick glance that I'm using a pointer at all – I know it doesn't make a type, I never declare multiple pointers per line ever anyway, and the 'space from each side' variant throws me off every time. Depending on the style guide you follow, your code might look slightly different but the core concepts will carry over.
With that accomplishment under our belts, let's go back to the theory for a while and see how Static Interfaces fit into the picture.
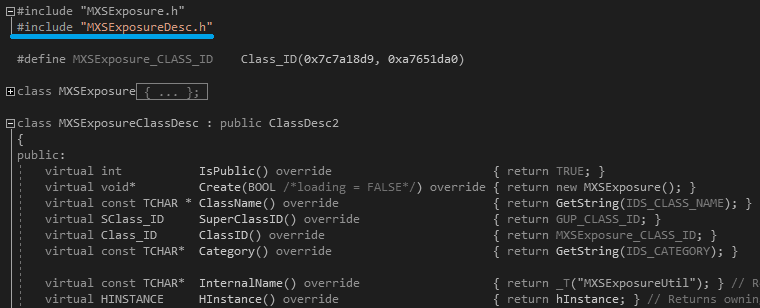
Fortunately, there are not that many differences between the two approaches to require a complete rewrite. We can easily convert our current project to use the Static Interface instead. The plugin name will revert back to MXSExposure without the -Util suffix, and the IMXSExposure class will become IMeshTools.
Underlined are the InternalName and ClassName of the utility plugin inside the MXSExposure.cpp which now need to reflect the desired name, and the GetDesc function which returns the pointer to the ClassDesc instance itself that we will need to get:
That's the function we want to call; but if you go to the matching header file (MXSExposure.h), you'll find that it's not declared there - and even if it were, we wouldn't want to include this one because it turns off the Code Analysis warnings without saving the previous state beforehand. The thing is, we don't have to.
Let's make our own specialized header file (Header Files > Add > New Item...), I'll append 'Desc' to the filename making it MXSExposureDesc in the context of my project. Copy the function signature and paste it into the empty header file and add a semicolon at the end (function declaration needs one, just like statements do). And if VS complains about not being able to recognize the ClassDesc2 type, CTRL+click through the type from the function definition next to the original class to see it's declared in iparamb2.h, and #include that. This will work:
#pragma once
#include <iparamb2.h>

ClassDesc2* GetMXSExposureDesc();
Those of you who are already familiar with the language may note that since the return type is a pointer, you might forward declare the class ClassDesc2; instead – well, yes and no, and above all – don't make it needlessly hard on your yourself. For one, if the header file in question would be #included elsewhere within the same translation unit, it won't make a difference (assuming that it's guarded against multiple includes); this is true for the main class file but not our interface one. But what the FPInterfaceDesc constructor accepts isn't really a pointer to ClassDesc2, it's a pointer to ClassDesc from which it inherits. And even if it weren't, it's not significant enough to agonize over that. Either way, it may have shed some light on why you'll often see class declarations like this elsewhere.
With that settled, let's include this header into the file where the GetDesc function is defined. This way, we've exposed the function to anyone who now #includes this header.
Now that you've done that, #include it into the IMeshTools class file. In place of the nullptr, use the pointer returned by the GetDesc function. The FP_STATIC_METHODS flag specifies that the interface can be called on the supplied ClassDesc itself, i.e. it doesn't need an instance of an object created by the ClassDesc. That's the GlobalUtilityPlugin that we gave the 'Util' suffix when using Core Interface because we wouldn't be using it. Here it will group all the interfaces under one roof for us.
The edited IMeshTools file should now look roughly like this:
#pragma once
#include "warnings_disabled.h"
#include <ifnpub.h>
#include "warnings_restored.h"
#include "MXSExposureDesc.h"

#define FUNC_STR(func) _M(#func) // stringifies the passed variable
#define FUNC_ID(func) func##_id  // concatenates the variable name with _id

extern const Interface_ID MESHTOOLS_INTERFACE_ID

class IMeshTools : public FPInterfaceDesc
{
public:
    enum functionId : FunctionID {
        FUNC_ID(SetMeshSelLevel),
    };

    IMeshTools() :
        FPInterfaceDesc(
            MESHTOOLS_INTERFACE_ID, _M("MeshTools"), 0, GetMXSExposureDesc(), FP_STATIC_METHODS
            , p_end) {
        AppendFunction(
            FUNC_ID(SetMeshSelLevel), FUNC_STR(SetMeshSelLevel), 0, TYPE_VOID, 0, 2
            , _M("mesh"), 0, TYPE_MESH
            , _M("level"), 0, TYPE_INT
            , p_end);
    };

    BEGIN_FUNCTION_MAP
        VFN_2(FUNC_ID(SetMeshSelLevel), SetMeshSelLevel, TYPE_MESH, TYPE_INT)
    END_FUNCTION_MAP

    void SetMeshSelLevel(Mesh* mesh, int level) const;
};
After you have built the project and run Max, you should be able to query and access it:
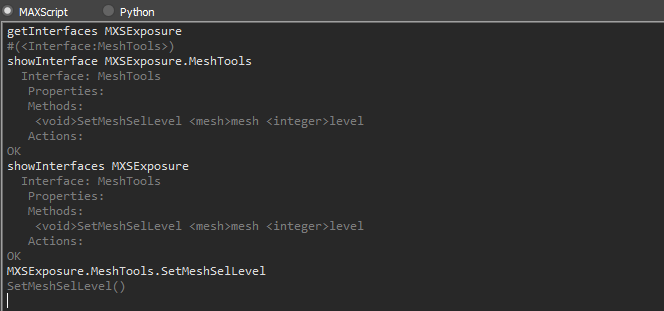
It's up to you whether you want to keep adding the methods to the Static or Core interface version of the project. As you can see there's no difference other than the way how the interfaces are accessed. All of my code samples that will follow will use the Core interface.
The next method to make the UV Seam Select modifier work should give us the seam edges to work with. We could set the selection directly in the Mesh we receive and return void but to make things more interesting, let's return a BitArray that will hold the seam edge indices. Having a helper method that returns something we use in MAXScript would often make more sense and be more flexible. As for the parameters, we need to pass the actual Mesh, and of course the map channel we'd like to get the edges for:
BitArray* GetMeshMapSeams(Mesh* mesh, int mapChannel) const;
For the function map, we'll use the FN_2 macro since we're returning something now. And that's also the only difference from the VFN_2 macro used earlier – before the function itself comes the type of the return value, here that corresponds to TYPE_BITARRAY:
FN_2(FUNC_ID(GetMeshMapSeams), TYPE_BITARRAY, GetMeshMapSeams, TYPE_MESH, TYPE_INT)
Within the AppendFunction call, the function description parameters on the first line follow the same pattern as with the previous function, with the exception of nonzero flafs this time. For the sake of illustration to show more features, I'm using the option to turn off automatic redraw here (the FP_NO_REDRAW flag):
FUNC_ID(GetMeshMapSeams), FUNC_STR(GetMeshMapSeams), 0, TYPE_BITARRAY, FP_NO_REDRAW, 2
The parameter names and types complete the picture here (as always, the p_end tag comes at the very end):
, _M("mesh"), 0, TYPE_MESH
, _M("mapChannel"), 0, TYPE_INT
, p_end);
And don't forget to add an ID to the functionID enum:
FUNC_ID(GetMeshMapSeams)
This is how it all looks in context of the header file:
#pragma once
#include "warnings_disabled.h"
#include <ifnpub.h>
#include "warnings_restored.h"

#define FUNC_STR(func) _M(#func) // stringifies the passed variable
#define FUNC_ID(func) func##_id  // concatenates the variable name with _id

extern const Interface_ID MXSEXPOSURE_INTERFACE_ID; // not specified here, just made available for callers

class IMXSExposure : public FPInterfaceDesc
{
public:
    enum functionID : FunctionID {
        FUNC_ID(SetMeshSelLevel),
        FUNC_ID(GetMeshMapSeams),
    };

    IMXSExposure() :
        FPInterfaceDesc(
            MXSEXPOSURE_INTERFACE_ID, _M("MXSExposure"), 0, nullptr, FP_CORE
            , p_end) {
        AppendFunction(
            FUNC_ID(SetMeshSelLevel), FUNC_STR(SetMeshSelLevel), 0, TYPE_VOID, 0, 2
            , _M("mesh"), 0, TYPE_MESH
            , _M("level"), 0, TYPE_INT
            , p_end);
        AppendFunction(
            FUNC_ID(GetMeshMapSeams), FUNC_STR(GetMeshMapSeams), 0, TYPE_BITARRAY, FP_NO_REDRAW, 2
            , _M("mesh"), 0, TYPE_MESH
            , _M("mapChannel"), 0, TYPE_INT
            , p_end);
    }

    BEGIN_FUNCTION_MAP
        VFN_2(FUNC_ID(SetMeshSelLevel), SetMeshSelLevel, TYPE_MESH, TYPE_INT)
        FN_2(FUNC_ID(GetMeshMapSeams), TYPE_BITARRAY, GetMeshMapSeams, TYPE_MESH, TYPE_INT)
    END_FUNCTION_MAP

    void SetMeshSelLevel(Mesh* mesh, int level) const;
    BitArray* GetMeshMapSeams(Mesh* mesh, int mapChannel) const;
};
Once again, let's add the definition for the method. This is what the FixIts make super easy:
If you're not a fan of the tiny workspace that pops up, you can promote the Peek View to document just as easily:

Implementing the function will be a bit more complex and educational this time:
#include "warnings_disabled.h"
#include <mesh.h>
#include <mnmesh.h>
#include "warnings_restored.h"
#include "IMXSExposure.h"

#pragma warning(suppress: 26426) // non-constexpr constructor
const Interface_ID MXSEXPOSURE_INTERFACE_ID(0x445ddd85, 0x24dd2aa1);
#pragma warning(suppress: 26426) // non-constexpr constructor
static IMXSExposure interfaceSingleton;

void IMXSExposure::SetMeshSelLevel(Mesh* mesh, int level) const {
 if (mesh) mesh->selLevel = level;
}

BitArray* IMXSExposure::GetMeshMapSeams(const Mesh* mesh, int mapChannel) const {
    if (!mesh || !mesh->mapSupport(mapChannel))
        return nullptr; // translates to 'undefined' in MAXScript

    MNMesh poly(*mesh); // dereferencing the pointer
    Mesh meshCopy(*mesh);

    if (!poly.nume)
        return nullptr; // without edges, there are no seams

    poly.ClearEFlags(MN_SEL);
    poly.SetMapSeamFlags(mapChannel);
    poly.PropegateComponentFlags(MNM_SL_EDGE, MN_SEL, MNM_SL_EDGE, MN_EDGE_MAP_SEAM);
    poly.OutToTri(meshCopy);

    if (mesh->numFaces != meshCopy.numFaces)
        return nullptr; // topology changed when converting to poly

    return new BitArray(meshCopy.edgeSel);
}
You may have noticed the mesh argument now points to a const Mesh, because we're not modifying the mesh in any way, nor are we calling any of its methods that might be non-const. If we instead opted for setting the selection directly on the mesh, we'd have to drop the const keyword.
After the initial early-exit null check we also check if the mapChannel is supported, and if not return undefined (if the caller is MAXScript code). You could throw an exception with a descriptive message instead, if you prefer that.
Next, a new MNMesh is created from the Mesh pointer passed to the method. MNMesh is a winged-edge/polygonal mesh class (i.e. what Editable_Poly uses under the hood), and the constructor accepts a Mesh reference – since we have a pointer, we need to dereference it first. A copy of the original Mesh is created in a similar manner – both are local variables that will be automatically deallocated at the end of the enclosing code block. This also means that it wouldn't be a good idea to return their addresses or addresses of any of their members as they will be destroyed when the function returns.
If the number of poly edges is zero, it's time to return undefined again (or throw an exception). It's more descriptive to check against zero; I only chose to write it this way to demonstrate something you will see pretty often, too.
Normally you'd also call MakePolyMesh on the MNMesh created from triangular Mesh. Yes, you can still have triangle faces with invisible (yet selectable) edges in Editable poly as well - it used to be a longstanding issue of the Quadify Mesh modifier (you had to add Turn to Poly or convert to mesh, then to poly again to get rid of the invisible edges). Since we don't care about this and only want to query some edge flags, we can safely skip that step.
To protect against the possibility that some of the edges has already been selected, it's better to clear the selection flags. Once this is done, map seam flags for the mapChannel are set, and propagated to selection flags on the next line – selection will be kept during the conversion back to Mesh which is needed here because the indexing is different between the two. Now that we're done with the poly operations, we can output the updated Mesh to the meshCopy variable.
Another if test is there to make sure the updated meshCopy has the same number of edges as the mesh we want to apply the edge selection to in the end. The local meshCopy uses the dot operator directly, for the pointer variable we have to use the arrow operator (or dereference manually and then use the dot operator). For a Mesh, number of edges is always number of faces times three so the comparison will yield the same result for both.
At the end, a new BitArray is dynamically allocated and returned, copying the contents of the meshCopy edge selection. As you remember, meshCopy is local to the function body and will be destroyed once out of scope.
// can be returned by value (a copy is made, local is destroyed)
// but that's not very efficient; and MXS expects a *pointer val
// for most of reasonably complex types, primitive values are OK
// if you returned &localVar address, it would point to garbage
BitArray localVar(size);

// can return straight to MAXScript, comes with responsibility
// if method gives you pointer it may come with 'needDel' bool
// if true, you are the one who is responsible for the cleanup
BitArray* dynamicVar = new BitArray(size);
To clear up why checking if the face counts are the same was necessary in the first place, let me explain a few peculiarities that Mesh allows, which are impossible in poly and would get lost in translation. For example, the Teapot primitive is built with rows of face pairs that share an invisible edges to form a quad. Instead of having a special case to generate triangles on the lid top (and the bottom of the body), the 'quads' in the last row are made by one regular triangular face and one zero-area face defined by two vertices (and they still share invisible edges). The two-vert face has three edges like all the other faces, it's just that for one of the edges both its vertex indices point to the same vertex, the top one.
This is illegal in poly world so you'd get a random-looking result if you didn't check for this case and applied the renumbered edge selection. Null edges are not the only possible issue; for example poly edges can have at maximum two adjacent faces – you can't take an edge in the middle of a surface and shift-drag it to create new face, that only works if it's open edge. In meshes, two vertices can be shared among an unlimited number of faces.
The main reason I chose to go the poly route here – rather than with an uneventful and safe loop without loopholes – was to illustrate some roadblocks you might encounter along the way, which will become obvious once you try to build the project. And if I didn't mention #including mnmesh.h this time around, it's because I trust you'll be able to work it out for yourself. Let's do that and try and see what happens when we build the project:
1>IMXSExposure.obj : error LNK2019: unresolved external symbol "public: virtual __cdecl MNMesh::~MNMesh(void)" (??1MNMesh@@UEAA@XZ) referenced in function "public: class BitArray * __cdecl IMXSExposure::GetMeshMapSeams(class Mesh *,int)const " (?GetMeshMapSeams@IMXSExposure@@QEBAPEAVBitArray@@PEAVMesh@@H@Z)
1>IMXSExposure.obj : error LNK2019: unresolved external symbol "public: void __cdecl MNMesh::Init(void)" (?Init@MNMesh@@QEAAXXZ) referenced in function "public: __cdecl MNMesh::MNMesh(class Mesh const &)" (??0MNMesh@@QEAA@AEBVMesh@@@Z)
1>IMXSExposure.obj : error LNK2019: unresolved external symbol "public: void __cdecl MNMesh::Clear(void)" (?Clear@MNMesh@@QEAAXXZ) referenced in function "public: void __cdecl MNMesh::SetFromTri(class Mesh const &)" (?SetFromTri@MNMesh@@QEAAXAEBVMesh@@@Z)
1>IMXSExposure.obj : error LNK2019: unresolved external symbol "public: int __cdecl MNMesh::PropegateComponentFlags(int,unsigned long,int,unsigned long,bool,bool)" (?PropegateComponentFlags@MNMesh@@QEAAHHKHK_N0@Z) referenced in function "public: class BitArray * __cdecl IMXSExposure::GetMeshMapSeams(class Mesh *,int)const " (?GetMeshMapSeams@IMXSExposure@@QEBAPEAVBitArray@@PEAVMesh@@H@Z)
1>IMXSExposure.obj : error LNK2019: unresolved external symbol "public: void __cdecl MNMesh::AddTri(class Mesh const &)" (?AddTri@MNMesh@@QEAAXAEBVMesh@@@Z) referenced in function "public: void __cdecl MNMesh::SetFromTri(class Mesh const &)" (?SetFromTri@MNMesh@@QEAAXAEBVMesh@@@Z)
1>IMXSExposure.obj : error LNK2019: unresolved external symbol "public: void __cdecl MNMesh::OutToTri(class Mesh &)" (?OutToTri@MNMesh@@QEAAXAEAVMesh@@@Z) referenced in function "public: class BitArray * __cdecl IMXSExposure::GetMeshMapSeams(class Mesh *,int)const " (?GetMeshMapSeams@IMXSExposure@@QEBAPEAVBitArray@@PEAVMesh@@H@Z)
1>IMXSExposure.obj : error LNK2019: unresolved external symbol "public: void __cdecl MNMesh::FillInMesh(void)" (?FillInMesh@MNMesh@@QEAAXXZ) referenced in function "public: __cdecl MNMesh::MNMesh(class Mesh const &)" (??0MNMesh@@QEAA@AEBVMesh@@@Z)
1>IMXSExposure.obj : error LNK2019: unresolved external symbol "public: void __cdecl MNMesh::SetMapSeamFlags(int)" (?SetMapSeamFlags@MNMesh@@QEAAXH@Z) referenced in function "public: class BitArray * __cdecl IMXSExposure::GetMeshMapSeams(class Mesh *,int)const " (?GetMeshMapSeams@IMXSExposure@@QEBAPEAVBitArray@@PEAVMesh@@H@Z)
1>IMXSExposure.obj : error LNK2001: unresolved external symbol "public: virtual class BaseInterface * __cdecl MNMesh::GetInterface(class Interface_ID)" (?GetInterface@MNMesh@@UEAAPEAVBaseInterface@@VInterface_ID@@@Z)
1>MXSExposure.gup : fatal error LNK1120: 9 unresolved externals
Well, that was underwhelming. When you look up LNK2019 in the build reference, the first possible cause listed is 'The object file or library that contains the definition of the symbol is not linked'. This is what the .lib files from the maxsdk\lib\ folder are for, and the basic set is already pre-filled by the wizard when you first set up the project.
There are several ways to find out which one is missing; I'll use the good old command prompt. For the command to work, you must either specify the full path to dumpbin executable or add the dumpbin.exe path to the PATH environment variable. To find it, go to the Microsoft Visual Studio folder in Program Files (x86) and search for dumpbin.exe; either one should work, I used the path to the HostX64\x64 one.
Once you have taken care of that, open Windows Explorer and navigate to the lib\x64\Release folder in the maxsdk directory. Paste the following line into the address bar:
cmd /S /K "for %i in (*.lib) do @dumpbin /exports "%i" | findstr /i "SetMapSeamFlags" > nul && echo %i"

When you hit enter, it opens the command line prompt and executes the command after the /k switch, which in turn calls dumpbin to list all exported definitions for each of the .lib files, and the result is filtered by findstr matching against 'SetMapSeamFlags' (that's the method we wanted to use, and one of the unresolved symbols listed in the build Output) while /ignoring case. The findstr output is dropped by being redirected to nul, and if the findstr succeeds, the name of the .lib file is printed to the command prompt window using echo:

If you want to make sure you got the right file that contains the right methods, you can check the filtered dumpbin output for the .lib file that matches the query:

So with that sorted, you can now edit the project properties, navigate to Linker > Input > Additional Dependencies and add the lib file (in our case MNMath.lib) to the list – either by directly clicking on the line and editing it or by selecting Edit... from the dropdown menu. The project should now build successfully.
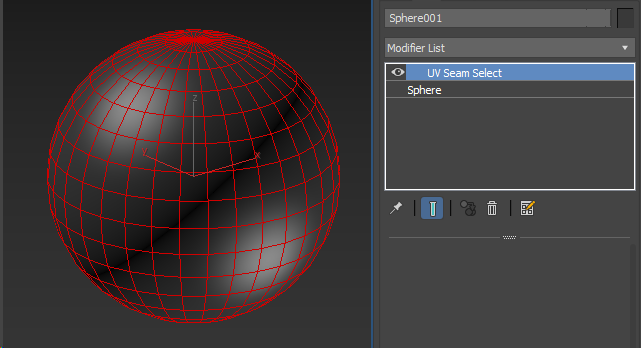
That means that right after testing and confirming that it works, we should be able to use it in our modifier:
plugin simpleMeshMod UVSeamSelectname:"UV Seam Select"classID:#(0x34c4905c, 0x106b1548)(parameters main rollout:params(mapChannel type:#integer ui:spnMapChannel default:1)rollout params "Parameters"(spinner spnMapChannel "Map Channel:" type:#integer range:[1,99,1])on modifyMesh do(local channelEdges = MXSExposure.GetMeshMapSeams mesh mapChannelif channelEdges != undefined do setEdgeSelection mesh channelEdgesMXSExposure.SetMeshSelLevel mesh 8))
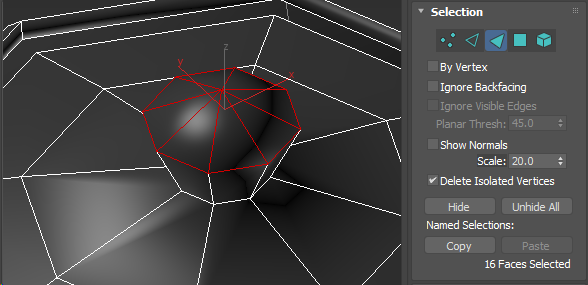
Indeed, the selection is set and passed up the stack, so you can use it for example to extrude the map seam edges:
These were both rather straightforward functions, but sometimes you need additional input not given by the user. An example would be getting the current time for time-dependent functions. As usual, there are many ways to go about that, and I will start with the more universal one to illustrate the concept of using COREInterface methods.
GetCOREInterface()/UtilGetCOREInterface() (and their subsequent numbered variants added in later max versions) give you access to the interface for calling various useful methods. This interface is so widely used that you'll see it often referenced as the 'ip' variable all throughout the SDK sample files.
Since it always gives you the same thing and you are more than likely to use it repeatedly, you can just as well make it accessible as a class member ip and be done with that:
#pragma once
#include "warnings_disabled.h"
#include <ifnpub.h>
#include <systemutilities.h>
#include "warnings_restored.h"

#define FUNC_STR(func) _M(#func) // stringifies the passed variable
#define FUNC_ID(func) func##_id // concatenates the variable name with _id

extern const Interface_ID MXSEXPOSURE_INTERFACE_ID; // not specified here, just made available for callers

class IMXSExposure : public FPInterfaceDesc
{
    Interface* ip = UtilGetCOREInterface();
public:
    enum functionId : FunctionID {
        FUNC_ID(SetMeshSelLevel),
        FUNC_ID(GetMeshMapSeams),
    };

    IMXSExposure() :
        FPInterfaceDesc(
            MXSEXPOSURE_INTERFACE_ID, _M("MXSExposure"), 0, nullptr, FP_CORE + FP_STATIC_METHODS
            , p_end) {
        AppendFunction(
            FUNC_ID(SetMeshSelLevel), FUNC_STR(SetMeshSelLevel), 0, TYPE_VOID, 0, 2
            , _M("mesh"), 0, TYPE_MESH
            , _M("level"), 0, TYPE_INT
            , p_end);
        AppendFunction(FUNC_ID(GetMeshMapSeams), FUNC_STR(GetMeshMapSeams), 0, TYPE_BITARRAY, FP_NO_REDRAW, 2
            , _M("mesh"), 0, TYPE_MESH
            , _M("mapChannel"), 0, TYPE_INT
            , p_end);
    };

    BEGIN_FUNCTION_MAP
        VFN_2(FUNC_ID(SetMeshSelLevel), SetMeshSelLevel, TYPE_MESH, TYPE_INT)
        FN_2(FUNC_ID(GetMeshMapSeams), TYPE_BITARRAY, GetMeshMapSeams, TYPE_MESH, TYPE_INT)
    END_FUNCTION_MAP

    void SetMeshSelLevel(Mesh* mesh, int level) const;
    BitArray* GetMeshMapSeams(const Mesh * mesh, int mapChannel) const;
};
You will need to #include some header file that makes it possible to use it, and there's more than one. Don't worry that much about it, aside from the question of dependencies included, there's very little difference. I went with this one because I also use mesh.h which #includes utillib.h where systemutilities.h is #included, too – but in the future, I may need to process scene nodes and will add inode.h which uses GetCOREInterface.h, and the point would be moot... It's good to be aware that the choice is there, but nothing bad will happen whether you choose one or the other. You may also notice I'm initializing the variable right as I declare it – depending on where you learn C++ from, this may or may not suprise you, so I should better note that since C++11 you can initialize member variables in-class like this – no reason to shy away from that, especially if it makes your code easier to read.
Without further ado, let's add a method that needs this interface – and in our example, this is going to be a simple ripple deform with a wave shift over time:
void RippleMeshDeform(Mesh* mesh, const Point3& center, float speed, float frequency, float amplitude);
As you can see from its signature, it doesn't return anything; it operates on the given mesh and in addition to that and a few numeric variables to control wave frequency, amplitude and shift speed, it expects a Point3 value by reference (const meaning we promise not to change it so function calls are forbidden, property access allowed). Now, my motivation behind this choice was first and foremost illustrative but the fact is that using it this way is not unheard of (point in case being several Edit Poly modifier methods). If you decide to use by-reference parameters, you have to also pick a matching type for the function map macro:
VFN_5(FUNC_ID(RippleMeshDeform), RippleMeshDeform, TYPE_MESH, TYPE_POINT3_BR, TYPE_FLOAT, TYPE_FLOAT, TYPE_FLOAT)
The _BR suffix in TYPE_POINT3_BR denotes pass-by-reference. There are others like _BV and _BP (by value and by pointer), _TAB for collections of the types, and combinations of the two. Refer to the Supported Types and Added Base Types chapters for more.
The rest of the code follows the same pattern as before:
#pragma once
#include "warnings_disabled.h"
#include <ifnpub.h>
#include <systemutilities.h>
#include "warnings_restored.h"

#define FUNC_STR(func) _M(#func) // stringifies the passed variable
#define FUNC_ID(func) func##_id // concatenates the variable name with _id

extern const Interface_ID MXSEXPOSURE_INTERFACE_ID; // not specified here, just made available for callers

class IMXSExposure : public FPInterfaceDesc
{
    Interface* ip = UtilGetCOREInterface();
public:
    enum functionId : FunctionID {
        FUNC_ID(SetMeshSelLevel),
        FUNC_ID(GetMeshMapSeams),
        FUNC_ID(RippleMeshDeform),
    };

    IMXSExposure() :
        FPInterfaceDesc(
            MXSEXPOSURE_INTERFACE_ID, _M("MXSExposure"), 0, nullptr, FP_CORE + FP_STATIC_METHODS
            , p_end) {
        AppendFunction(
            FUNC_ID(SetMeshSelLevel), FUNC_STR(SetMeshSelLevel), 0, TYPE_VOID, 0, 2
            , _M("mesh"), 0, TYPE_MESH
            , _M("level"), 0, TYPE_INT
            , p_end);
        AppendFunction(FUNC_ID(GetMeshMapSeams), FUNC_STR(GetMeshMapSeams), 0, TYPE_BITARRAY, FP_NO_REDRAW, 2
            , _M("mesh"), 0, TYPE_MESH
            , _M("mapChannel"), 0, TYPE_INT
            , p_end);
        AppendFunction(
            FUNC_ID(RippleMeshDeform), FUNC_STR(RippleMeshDeform), 0, TYPE_VOID, 0, 5
            , _M("mesh"), 0, TYPE_MESH
            , _M("center"), 0, TYPE_POINT3_BR
            , _M("speed"), 0, TYPE_FLOAT
            , _M("frequency"), 0, TYPE_FLOAT
            , _M("amplitude"), 0, TYPE_FLOAT
            , p_end);
    };

    BEGIN_FUNCTION_MAP
        VFN_2(FUNC_ID(SetMeshSelLevel), SetMeshSelLevel, TYPE_MESH, TYPE_INT)
        FN_2(FUNC_ID(GetMeshMapSeams), TYPE_BITARRAY, GetMeshMapSeams, TYPE_MESH, TYPE_INT)
                VFN_5(FUNC_ID(RippleMeshDeform), RippleMeshDeform, TYPE_MESH, TYPE_POINT3_BR, TYPE_FLOAT, TYPE_FLOAT, TYPE_FLOAT)
    END_FUNCTION_MAP

    void SetMeshSelLevel(Mesh* mesh, int level) const;
    BitArray* GetMeshMapSeams(const Mesh * mesh, int mapChannel) const;
    void RippleMeshDeform(Mesh* mesh, const Point3& center, float speed, float frequency, float amplitude);
};
In the function implementation, we start with the usual null check and then in the same step we make sure there are vertices to deform. Once this has been confirmed, we proceed to use the ip pointer. To be able to call any of the functions of the interface, the maxapi header has to be present – don't worry, Visual Studio is very helpful in this regard and will warn you if you forget, and then it's one click-through from the declaration to see which file you need. The TicksToSec macro converts the time (which is returned in ticks) for us into a meaningful, self-documenting value that we can then multiply by the desired speed:
#include "warnings_disabled.h"
#include <maxapi.h>
#include <mesh.h>
#include <mnmesh.h>
#include "warnings_restored.h"
#include "IMXSExposure.h"

...

float get2DLength(float x, float y) {
    return sqrt(x * x + y * y);
}

void IMXSExposure::RippleMeshDeform(Mesh* mesh, const Point3& center,
    float speed, float frequency, float amplitude)
{
    if (!mesh || !mesh->numVerts) return;

    const float shift = TicksToSec(ip->GetTime()) * speed;
    auto vert = &(mesh->getVert(0));

    for (int v = 0, numVerts = mesh->numVerts; v < numVerts; ++v, ++vert)
        vert->z += amplitude * sin(frequency * get2DLength(vert->x - center.x, vert->y - center.y) - shift);
}
And now let's see if you did your homework and familiarized yourself with pointers. A Mesh is a super simple structure with most of its data neatly packed in simple arrays. And if you remember how arrays work, you'll recall that when you receive an array, you essentially get a pointer to the first item. Increment that pointer and you have a pointer to the second item, and so on. So when you ask for the first vertex and take its address, you have the address of the beginning of the array. Alternatively, we could have just as well used auto vert = mesh->verts;
This is all pretty clean and safe, just bear in mind that you'll see C-style casts scattered over the samples and snippets all over the web – the rule with using C-style casts and C++ is simple – don't. When you want to use a cast, chances are you want dynamic_cast (in case you missed this tidbit from the documentation, I'm gonna quote General Best Practices here: Use dynamic_cast instead of using the unsafe static_cast and always check the result for NULL to make sure that it succeeded).
Now, let's take a peek at the for loop. It's a bit on the lengthy side – if I were to actually use that in this form, I'd at least split it at each semicolon – and it does many things at once. The first initialization part is executed only once at the very beginning and sets the counter variable (that then gets compared against the total number of verts), and the total number of verts to check against. The second part is the actual comparison being evaluated, which happens repeatedly as a condition before executing the loop body. And the final part increments both the loop counter and the vertex pointer, right after the body is finished executing. There's also range-based loop variant that's worth getting acquainted with but you can't use that when all you have is an array pointer. An elegant solution is using spans – but that's only available in the Guideline Support Library or if you wait for C++20.
The loop body itself is in fact pretty uneventful compared to the previous line. The z value of the current vert is incremented by a sin of the horizontal distance from the current vert to the center position, multiplied by the frequency, and shifted by the product of time and speed. The get2DLength function, which calculates the distance in the XY plane, is defined right before the RippleMeshDeform function. And that's it for now for the C++ part.
You already know the rest of the drill, CTRL+F5 and put it to the test in Max. For that, I've prepared another simpleMeshMod:
plugin simpleMeshMod SimpleRipplename:"Simple Ripple"classID:#(0x68a11be6, 0x4ec696e8)usePBValidity:off -- always trigger update on time change(parameters main rollout:params(speed type:#float ui:spnSpeed default:10frequency type:#float ui:spnFrequency default:1amplitude type:#worldUnits ui:spnAmplitude default:1source type:#node ui:pbSource useNodeTmValidity:on_dummy type:#maxObjectTab tabSizeVariable:on)rollout params "Parameters"(pickButton pbSource "NONE" width:140 autoDisplay:onspinner spnSpeed "Speed: " type:#float range:[0,1e6,0]spinner spnFrequency "Frequency: " type:#float range:[0,1e6,1]spinner spnAmplitude "Amplitude: " type:#worldUnits range:[-1e6,1e6,1])on attachedToNode node do if isValidNode node doappend this._dummy (NodeTransformMonitor node:node) -- explicitly trigger update whenever node transform changeson modifyMesh do(local center = if isValidNode source then (source.transform * inverse owningNode.objectTransform).pos else [0,0,0]MXSExposure.RippleMeshDeform mesh center speed frequency amplitude))
Since we are always using the current time to calculate the wave shift, don't forget to use usePBValidity:off, otherwise an update would only be triggered if any of the params of the parameter block used an animated controller at that time.
With that in place, the time-dependent changes should work as desired:
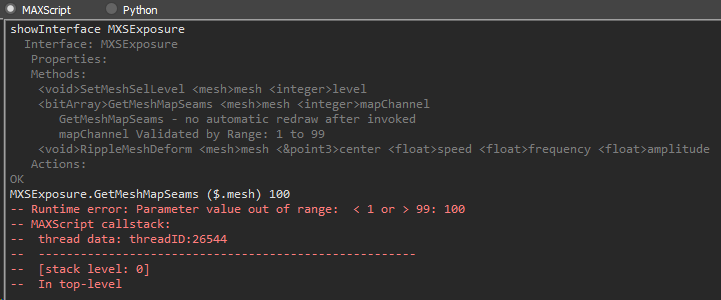
So far, we've done all the necessary checks ourselves (if any – SetMeshSelLevel never checks if it received a valid level!). If you were thinking there must be a better way, you're right. Let's start with the GetMeshMapSeams, it would make sense if you weren't allowed to pass a map channel number that's outside the regularly used 1..99 range. To do that, it's enough to add a f_range tag to the parameter in question, followed by the lower and upper bounds within the AppendFunction call:
AppendFunction(
 FUNC_ID(GetMeshMapSeams), FUNC_STR(GetMeshMapSeams), 0, TYPE_BITARRAY, FP_NO_REDRAW, 2
 , _M("mesh"), 0, TYPE_MESH
 , _M("mapChannel"), 0, TYPE_INT, f_range, 1, 99
 , p_end);
Super simple and super handy. A bit limited, though, because sometimes you may want to validate a predefined set of values, values that are not inherently floats or ints, or values like Point3. That's why there's also f_validator for your own custom validator function. We'll need to give it a pointer to our validator class instance, and that class we first have to create. I'll call mine Point3Validator:
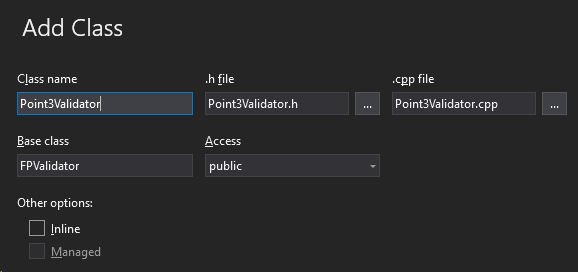
Now let's go ahead and implement the inherited method right away (via Quick Actions, either through right-click or CTRL+.):
Here's an example of how you might approach it:
#include <point3.h>
#include "Point3Validator.h"

bool Point3Validator::Validate(FPInterface*, FunctionID, int, FPValue& val, MSTR& msg) {
    const bool valid = isfinite(val.p->x) && isfinite(val.p->y) && isfinite(val.p->z);
    if (!valid) msg = _T("Center must be a valid position.");
    return valid;
}

Point3Validator* GetPoint3Validator()
{
    static Point3Validator point3Validator;
    return &point3Validator;
}
Since we'll be working with Point3 values, a point3.h header file is needed. For the Validate function itself, the first thing you may notice is that the first three parameters no longer have names – since we won't be using them within the function body, the compiler would warn us about that otherwise (C4100: unreferenced formal parameter), and this way, you can make your intentions clear. Next comes the actual validation, here it is checking if all three parts are finite (neither infinite nor NaN). Since the FPValue is sort of a catch-all container, you have to access its member variable matching to the type you're checking – the p in val.p gives you Point3*. If it's not valid, set the msg to a descriptive message, and return the valid bool.
As mentioned before, we need a pointer to supply with the f_validator tag, and for that there's the other function, analogous to the GetDesc function we've seen before. Put its declaration to the class header file, and include the header in the interface class file. For completeness sake, here's the updated header file:
#pragma once
#include <ifnpub.h>

class Point3Validator : public FPValidator {
    virtual bool Validate(FPInterface* fpi, FunctionID fid, int paramNum, FPValue& val, MSTR& msg) override;
};

Point3Validator* GetPoint3Validator();
After that, this should compile and work as expected:
#pragma once
#include "warnings_disabled.h"
#include <ifnpub.h>
#include <systemutilities.h>
#include "warnings_restored.h"
#include "Point3Validator.h"

#define FUNC_STR(func) _M(#func) // stringifies the passed variable
#define FUNC_ID(func) func##_id // concatenates the variable name with _id

extern const Interface_ID MXSEXPOSURE_INTERFACE_ID; // not specified here, just made available for callers

class IMXSExposure : public FPInterfaceDesc
{
    Interface* ip = UtilGetCOREInterface();
public:
    enum functionId : FunctionID {
        FUNC_ID(SetMeshSelLevel),
        FUNC_ID(GetMeshMapSeams),
        FUNC_ID(RippleMeshDeform),
    };

    IMXSExposure() :
        FPInterfaceDesc(
            MXSEXPOSURE_INTERFACE_ID, _M("MXSExposure"), 0, nullptr, FP_CORE + FP_STATIC_METHODS
            , p_end) {
        ...
        AppendFunction(
            FUNC_ID(RippleMeshDeform), FUNC_STR(RippleMeshDeform), 0, TYPE_VOID, 0, 5
            , _M("mesh"), 0, TYPE_MESH
            , _M("center"), 0, TYPE_POINT3_BR, f_validator, GetPoint3Validator()
            , _M("speed"), 0, TYPE_FLOAT
            , _M("frequency"), 0, TYPE_FLOAT
            , _M("amplitude"), 0, TYPE_FLOAT
            , p_end);
    };

    BEGIN_FUNCTION_MAP
        VFN_2(FUNC_ID(SetMeshSelLevel), SetMeshSelLevel, TYPE_MESH, TYPE_INT)
        FN_2(FUNC_ID(GetMeshMapSeams), TYPE_BITARRAY, GetMeshMapSeams, TYPE_MESH, TYPE_INT)
        VFN_5(FUNC_ID(RippleMeshDeform), RippleMeshDeform, TYPE_MESH, TYPE_POINT3_BR, TYPE_FLOAT, TYPE_FLOAT, TYPE_FLOAT)
    END_FUNCTION_MAP

    void SetMeshSelLevel(Mesh* mesh, int level) const;
    BitArray* GetMeshMapSeams(const Mesh * mesh, int mapChannel) const;
    void RippleMeshDeform(Mesh* mesh, const Point3& center, float speed, float frequency, float amplitude);
};
Take a look at what happens when an invalid position is passed as an argument:
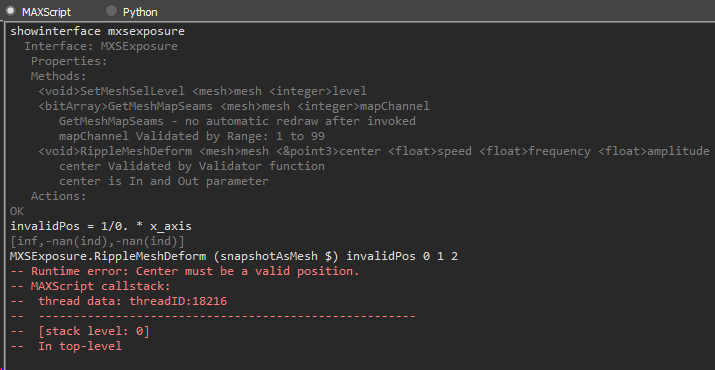
Seeing that showInterface printout, one more thing is bothering me. It says center is In and Out parameter but we never change it, so it gives the wrong impression. Luckily, there's another tag for that, and the tags can be chained so we can do this to change it to In parameter only:
AppendFunction(
    FUNC_ID(RippleMeshDeform), FUNC_STR(RippleMeshDeform), 0, TYPE_VOID, 0, 5
    , _M("mesh"), 0, TYPE_MESH
    , _M("center"), 0, TYPE_POINT3_BR, f_inOut, FPP_IN_PARAM, f_validator, GetPoint3Validator()
    , _M("speed"), 0, TYPE_FLOAT
    , _M("frequency"), 0, TYPE_FLOAT
    , _M("amplitude"), 0, TYPE_FLOAT
    , p_end);
Likewise, you can use f_keyArgDefault to mark optional keyword arguments. All you have to do is make sure that no other non-keyword argument follows it in the list of arguments, and you have to provide the default value:
AppendFunction(
    FUNC_ID(GetMeshMapSeams), FUNC_STR(GetMeshMapSeams), 0, TYPE_BITARRAY, FP_NO_REDRAW, 2
    , _M("mesh"), 0, TYPE_MESH
    , _M("mapChannel"), 0, TYPE_INT, f_range, 1, 99, f_keyArgDefault, 1
    , p_end);
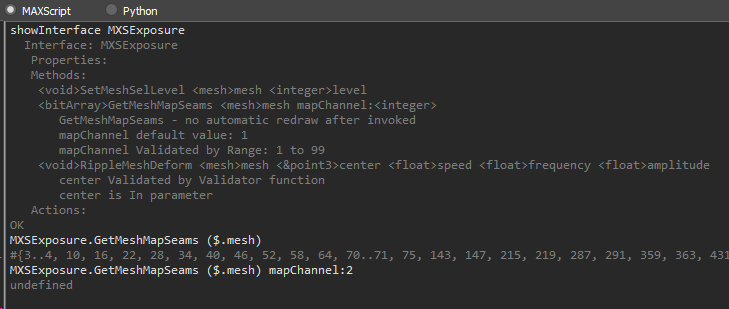
In this particular case, it's a rather contrived example but should be enough to give you an idea or two how to work with the tags. Notice also how the center has changed to In parameter type only.
However, we still haven't done anything about the SetMeshSelLevel argument validation – yes, we could use a validator but there's a better, self-documenting way, and that's to use a symbolic enumeration:
...

class IMXSExposure : public FPInterfaceDesc
{
    Interface* ip = UtilGetCOREInterface();
public:
    enum functionId : FunctionID {
        ...,
    };

    enum enumID : EnumID {
        selLevelID,
    ...

    IMXSExposure() :
        FPInterfaceDesc(
            MXSEXPOSURE_INTERFACE_ID, _M("MXSExposure"), 0, nullptr, FP_CORE + FP_STATIC_METHODS
            , p_end) {
        AppendFunction(
            FUNC_ID(SetMeshSelLevel), FUNC_STR(SetMeshSelLevel), 0, TYPE_VOID, 0, 2
            , _M("mesh"), 0, TYPE_MESH
            , _M("level"), 0, TYPE_ENUM, selLevelID
            , p_end);
        AppendFunction(
            ...);
        AppendEnum(
            selLevelID, 4
            , _M("object"), MESH_OBJECT
            , _M("vertex"), MESH_VERTEX
            , _M("edge"), MESH_EDGE
            , _M("face"), MESH_FACE
            , p_end);
    };

    BEGIN_FUNCTION_MAP
        VFN_2(FUNC_ID(SetMeshSelLevel), SetMeshSelLevel, TYPE_MESH, TYPE_ENUM)
        FN_2(FUNC_ID(GetMeshMapSeams), TYPE_BITARRAY, GetMeshMapSeams, TYPE_MESH, TYPE_INT)
        VFN_5(FUNC_ID(RippleMeshDeform), RippleMeshDeform, TYPE_MESH, TYPE_POINT3_BR, TYPE_FLOAT, TYPE_FLOAT, TYPE_FLOAT)
    END_FUNCTION_MAP

    void SetMeshSelLevel(Mesh* mesh, int level) const;
    BitArray* GetMeshMapSeams(const Mesh * mesh, int mapChannel) const;
    void RippleMeshDeform(Mesh* mesh, const Point3& center, float speed, float frequency, float amplitude);
};
Just like functions, enums must have IDs, but since the enum definition happens within the AppendEnum call, I'm using a fixed ID. For the AppendEnum, we need to pass number of members and their names and values, and we can directly use the flags from mesh.h for the values here. The only other change is from the TYPE_INT to TYPE_ENUM, and in the case of the AppendFunction, the enum type tag has to be followed by the enum ID. We should finally be able to replace that ugly 8 with something meaningful, as promised:
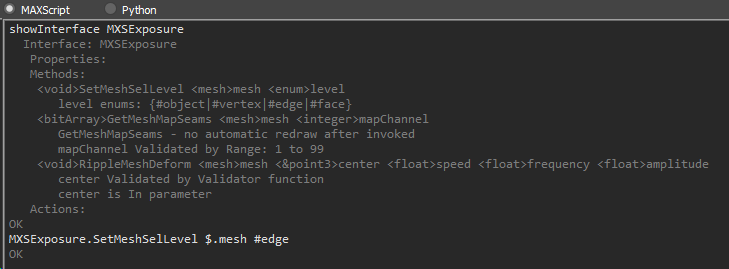
All of these changes were limited to the parameter list, without no edits to the actual function. That said, there's still a territory we haven't covered yet – other specialized function macros outside of FN and VFN. For one, there are macros that you can use to expose properties directly instead of through a getter/setter pair, those are PROP_FNS for the aforementioned getter/setter pairing, RO_PROP_FN for a read-only property (getter only, note the singular FN), their time-dependent variants PROP_TFNS/RO_PROP_TFN, and static method versions of all the previous four with the prefix SM_.
Then there are CFN functions with constant return values (they do a const_cast behind the scenes) – which I have never seen used anywhere. And finally, VFNT_/FNT_ for void/value-returning functions with time parameter, which is the same concept as the time-dependent properties mentioned earlier. In addition to the list of parameters given to the macro, they receive a time parameter – and guess where we could use it? Bingo, turns out we didn't need the Interface variable after all – but don't worry, it might come in handy for other tasks. Now let's update our RippleMeshDeform:
 BEGIN_FUNCTION_MAP
     VFN_2(FUNC_ID(SetMeshSelLevel), SetMeshSelLevel, TYPE_MESH, TYPE_ENUM)
     FN_2(FUNC_ID(GetMeshMapSeams), TYPE_BITARRAY, GetMeshMapSeams, TYPE_MESH, TYPE_INT)
     VFNT_5(FUNC_ID(RippleMeshDeform), RippleMeshDeform, TYPE_MESH, TYPE_POINT3_BR, TYPE_FLOAT, TYPE_FLOAT, TYPE_FLOAT)
 END_FUNCTION_MAP

 void SetMeshSelLevel(Mesh* mesh, int level) const;
 BitArray* GetMeshMapSeams(const Mesh * mesh, int mapChannel) const;
 void RippleMeshDeform(Mesh* mesh, const Point3& center, float speed, float frequency, float amplitude, const TimeValue& time);
The only two things that have changed in the header are the added V in the macro name and a new const TimeValue& time function parameter. On the cpp-side, it would be enough to replace ip->GetTime() with the new time variable...
void IMXSExposure::RippleMeshDeform(Mesh* mesh, const Point3& center,
    float speed, float frequency, float amplitude, const TimeValue& time)
{
    if (!mesh || !mesh->numVerts) return;

    static auto get2DLength = [](float x, float y) { return sqrt(x * x + y * y); };
    const float shift = TicksToSec(time) * speed;

    for (auto vert = mesh->verts, cutoff = vert + mesh->numVerts; vert != cutoff; ++vert)
        vert->z += amplitude * sin(frequency * get2DLength(vert->x - center.x, vert->y - center.y) - shift);
}
But since I'm a fan of the old 'train hard, fight easy' maxim, here it is with a bit more sensible loop variant – and to balance it out, a self-contained lambda that replaces the outer helper function. You should be able to make sense of this loop now that you've seen the previous one. Unlike the previous one, it doesn't have the problem that the vert variable would still be accessible outside the loop, pointing to a out-of-bounds garbage value should you ever come back to the function and extend it. The lambda is rather unremarkable, if it weren't for it being static – no problem here, but don't do this with capturing lambdas unless you want them to capture only once. Okay, that was enough confusion for today, the function works in both versions, and if you read through the whole post, you have earned a break.
In conclusion, Function Publishing is extremely flexible and powerful system, even if you only use it for a few critical functions and leave the rest to MAXScript and/or python. Don't be afraid to try it out and see for yourself. And most importantly, have fun!
DISCLAIMER: All scripts and snippets are provided as is under Creative Commons Zero (public domain, no restrictions) license. The author and this blog cannot be held liable for any loss caused as a result of inaccuracy or error within these web pages. Use at your own risk.


This Post needs Your Comment!
wow, that rocks, thank-you!
This is super impressive and overwhelming :)
I am very exited to try and learn from this.
Thank you so much!
Great Stuff here. Thanks for shearing.
max 2020 & vs 2019, when New Project name and location was confirmed, I got an error said "Operation aborted (Exception from HRESULT: 0x80004004 (E_ABORT))". How to solve this, Any idea?
Eric: Do you have the right permissions for the folders you've chosen? It's a pretty generic message and hard to tell what went wrong. If all else fails, you can create the project manually, see Manually Creating a New Plug-in Project in the docs.
I spent the whole day setting up the visual studio so that everything worked and the next day I found your blog :) So I already figured out the installation myself .. but thanks to you I was able to take this more difficult step, which is understanding how to start programming in c ++ for 3dsmax. Super useful stuff! Thank you VERY much! I am waiting for more on this rare topic :)
Thank you ! Mr. life saver !!
Leave a Comment